In a world where modernity often takes center stage, there is a unique allure and charm in objects that bear the marks of time's gentle touch. Old wood texture, with its weathered appearance and aged patina, stands as a testament to the beauty that can emerge from the passage of time. The artistry of nature and the elements combine to create a captivating texture, showcasing the history and story of the wood itself. Each crack, knot, and weathering pattern narrates a tale of resilience, adding a touch of nostalgia and rustic elegance to any space. In this exploration of old wood texture, we embark on a journey through the captivating world of weathered wood, discovering the profound impact it has on interior design, architecture, and creative endeavors.
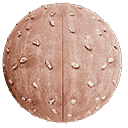
Old wood texture refers to the distinctive surface appearance of wood that has aged and weathered over time, developing a vintage and weathered patina. This texture showcases the unique character and charm that results from years of exposure to the elements, natural wear and tear, and the effects of time. Strip Old wood texture is characterized by features such as cracks, knots, uneven surfaces, faded colors, and the presence of weathering patterns.
Old wood texture is highly valued in various creative fields, including interior design, architecture, digital graphics, and art. It adds a sense of history and authenticity to spaces, evoking a nostalgic and rustic ambiance. Whether used in physical applications or as a digital asset, old wood texture brings a timeless and classic feel to any project.
Creating a vintage wood texture involves a combination of artistic techniques and digital tools to replicate the appearance of aged and weathered wood. Here's a step-by-step guide on how to make a vintage wood texture:
Step 1: Gather Reference Images:
Begin by collecting reference images of old wood surfaces with the texture and appearance you wish to replicate. Observe the specific features, such as cracks, weathering patterns, color variations, and the overall level of distress.
Step 2: Create a Base Texture:
Start with a base wood texture. You can use a high-resolution image of a wood surface or create a simple wood grain pattern using graphic design software. Ensure the base texture resembles the type of wood you want to simulate (e.g., oak, pine, or cedar).
Step 3: Add Weathering Effects:
To give the wood texture a weathered look, introduce various weathering effects, such as cracks, scratches, and worn areas. Use brushes, texture overlays, or blending modes in image editing software to create these effects. Pay attention to the natural flow of the wood grain to make the weathering appear authentic.
Step 4: Introduce Color Variations:
Seamless Old wood textures often have faded or aged colors. Apply subtle color adjustments to the base texture, such as desaturation or adding a sepia tone, to achieve the vintage appearance. Experiment with different color overlays to mimic the natural discoloration that occurs with age.
Step 5: Add Knots and Imperfections:
Incorporate knots, wood grain irregularities, and other imperfections to enhance the authenticity of the vintage wood texture. Use brushes or create custom shapes to simulate knots and wood grain variations, making sure to place them realistically within the wood's natural patterns.
Step 6: Integrate Stains and Patina:
Old wood surfaces may have stains or a patina resulting from exposure to moisture and various elements. Add these effects by applying texture overlays, using blending modes to integrate them seamlessly with the base texture.
Step 7: Fine-Tuning and Detailing:
Pay attention to the details to make the vintage wood texture more convincing. Adjust the opacity and blending modes of various layers, add highlights and shadows, and make subtle changes to achieve a balanced and realistic appearance.
Step 8: Test and Refine:
Regularly test the texture in different lighting conditions and perspectives to ensure it looks convincing. Make adjustments as needed to refine the vintage wood texture until you achieve the desired result.
Step 9: Save and Export:
Once you are satisfied with the vintage wood texture, save it in a high-resolution format and export it as a seamless texture if intended for tiling across surfaces in digital applications.
By following these steps, you can create your own authentic and visually compelling vintage wood texture that captures the essence of old, weathered wood and brings a touch of nostalgia and rustic charm to your creative projects. Whether used in digital design, architectural visualization, or physical applications, a well-crafted vintage wood texture can add depth and character to any project and evoke a sense of history and timelessness.