Comprehensive instructions for using the LotPixel Blender Add-on. Covers installation, auto-install via Hub, one click imports, texture/model/decal workflows, UI controls, displacement setup, and all Blender-specific behavior.
Complete Guide to Using the LotPixel Blender Add-on
The LotPixel Blender Add-on is installed in two ways:
The add-on installation screen appears in one of the following situations:
On this screen, click Install Plugin and the LotPixel Blender Add-on will be
automatically installed to
the correct Blender directory.
⚠️ Important: After installation, Blender must be restarted for the add-on to become active and
ready to use with LotPixel Hub.
No manual steps are required.
If needed, you can install the plugin manually by:
C:\Users\<your-username>\AppData\Roaming\Blender Foundation\Blender\<version>\scripts\startup
..\startup\Lotpixel Hub\__init__.py
Once the zip file is installed, the plugin is ready to use. No additional enabling steps are required.
The Add-on integrates directly with LotPixel Hub. Clicking Import inside the Hub automatically triggers Blender and imports:
No manual setup is required.
Note:
Assets are imported into the software selected in Import Settings → Import to application inside LotPixel Hub.
By default, the asset will be imported into the application that was last selected as the import to application.
You can change the target application at any time when clicking the Import button.
When a texture is imported via LotPixel Hub, the process is fully automated to ensure a fast and consistent workflow.
The texture is automatically applied to the currently selected object in Blender.
A complete PBR material is created from scratch. You do not need to create or configure materials manually.
All available texture maps (such as Albedo, Roughness, Normal, Metallic, Displacement, etc.) are connected automatically based on your Import Settings.
The material setup follows Blender's standard PBR workflow, ensuring compatibility with rendering engines such as Cycles and Eevee.
This behavior allows you to import textures quickly while maintaining a clean and consistent material structure.
Decals in LotPixel Hub are treated as texture-based materials and follow the same import logic as regular textures.
Decals use the same PBR material system as standard textures.
All decal texture maps are connected using the same automatic node setup defined in your Import Settings.
Mask, Opacity, and other relevant maps are handled automatically to ensure correct transparency behavior.
No additional decal-specific setup is required from the user.
This unified system ensures that decals integrate seamlessly into your existing workflow and behave consistently with other LotPixel materials.
Imperfections in LotPixel Hub work in two different modes, depending on the material state of the selected object.
If the selected object already has a LotPixel material assigned:
In this case, Imperfections typically influence the following channels:
This allows you to add:
without breaking or replacing the original material setup.
If the selected object has no material assigned at all:
This makes it possible to use Imperfections directly on an empty object as a quick starting material.
When a 3D model is imported through LotPixel Hub, Blender handles the process automatically with minimal user input.
Imported models are placed at the current 3D Cursor location in the scene.
The model is imported using the selected format (FBX or OBJ), as defined in your Import Settings.
If texture files are available for the model, materials are generated and assigned automatically.
This approach allows you to quickly bring models into your scene without manual cleanup or setup.
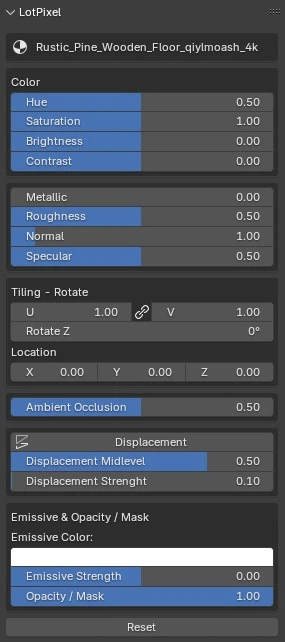
The LotPixel Add-on provides a custom UI panel inside Blender for quick adjustments:
These controls make material editing fast and non-destructive.
The LotPixel
Add-on provides a custom UI panel inside Blender for quick adjustments.
To access this panel, press N
to open the right-side toolbar and select the LotPixel tab.
For highest quality, EXR displacement maps are recommended.
When you enable Displacement inside the Add-on UI, Blender automatically:
You do not need to manually change Blender settings.
To see real displacement:
Your mesh must be high-poly or you must add a Subdivision Surface Modifier.